I wanted to update the engine’s fuel hoses to the more modern, safer braided stainless hoses.
Tools Used:
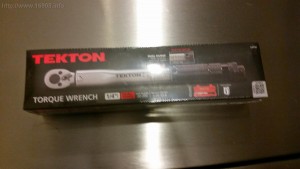
Inch Pounds Torque Wrench – I used this one: http://www.amazon.com/TEKTON-24320-4-Inch-Torque-20-200-Inch/dp/B00C5ZL2EG/
Open-end metric wrenches
Metric socket set
Vice
Utility Light
Grease
Berryman B12 Chemtool or other solvent cleaner
Nitrile gloves
shop rags/paper towels
Here’s the steps I came up with:
- Work in a well ventilated area. If I’m working in my garage, I keep the door open, with a fan pushing air out the door.
- Take the fire extinguisher out of your Delorean (you should have one), and keep it nearby.
- Disconnect the battery.
- Remove the air cleaner.
- Remove any plug wires that are easily accessible, and label their cylinder number with tape. Take pictures or make notes on how they are routed.
- Lift up on the clips that hold the injectors in place. Be careful not to bend them. There are three prongs on each clip.
- Label all hoses you remove, and take pictures, or make notes on how they are routed.
-
Remove the hoses:
- One at a time, remove the banjo bolts on the fuel distributer, warm up regulator, and cold start valve.
- Use paper towels or rags to soak up any gas. Dispose of the rags properly.
- Attempt to dump out any gas in the lines into a clean glass container. You can choose to re-use the gas if you like.
- Once the hose is off, screw the banjo bolt back in a few threads so it doesn’t get lost.
- Throw out the old copper washers, or put them in a container clearly marked “Used Washers.” We’ll find a use for them later.
- Clamp a 10 mm wrench in a vice, put the injector in the wrench, and use a socket to take the banjo bolt out of the injector.
- Set aside the injector banjo bolts.
-
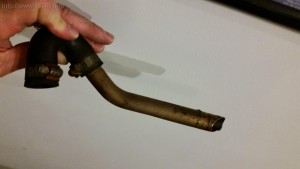
You will need to remove the “pipe of agony” to get to the #4 injector. I was determined to leave the pipe in place, and skip the agony, but after unsuccessfully trying to manipulate the injector out, I gave in. Here’s what I did:
- Disconnect the elbow from the idle speed motor.
- Slide out the pipe with the rubber elbow still attached
- Clean the injectors if desired (see below)
- Replace the old hoses and washers with the new hoses, and new washers. Don’t re-use the old washers!
- Leave the banjo bolts loose in case a hose needs to be re-routed. You can torque the banjo bolts later.
- Lay your plug wires in place.
-
Check to make sure the pipe of agony will fit with your hoses and plug wires.
- My #4 Cylinder plug wire and fuel hose are routed under the pipe
- My #5 and #6 Cylinder plug wires are over the pipe
- My #6 Cylinder hose runs over the pipe, while my #5 Cylinder hose runs under the pipe
- Make sure the engine cover will close with the hoses coming off the fuel distributer, running to the warm up regulator.
-
Now torque the banjo bolts. For this, I used my new inch-pound torque wrench:
- M8 Banjo bolts: 7-9 foot lbs., or 84-108 inch lbs.
- M10, Banjo bolts: 9-11 foot lbs., or 108-132 inch lbs.
- I first started with the bare minimum torque setting, then re-torqued them to a value approximately in the middle of the range.
-
Reinstall the “Pipe of Agony” or in my case, the “Pipe of Ease.” Finding the spot to reinstall the pipe is tricky. For me, it slid right in with ease on the first try. Here’s how I did it:
- Grease up the end of the pipe. I used a pea size amount of synthetic brake grease, which will hold up to the engine’s heat very well.
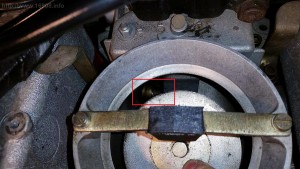
- Bend over the engine compartment, with the top of your head near the firewall, and your left eye near the warm up regulator. You should be able to barely spot where the pipe goes into the air meter housing. There’s a brass ring, or keeper that the pipe slides into.
- Some people put a small flashlight in the air meter housing, which aides finding the spot to insert the pipe because light shines out the air meter housing hole. I didn’t need it.
- Shove it in. The rubber hose lined up with the idle speed motor, and I could see the end of the pipe in the air meter housing:
- Reinstall the air cleaner.
- Reconnect the battery.
- Attempt to start the car. You will need to let the pump prime for a bit, and give it some gas during startup.
- While the car is running, check for leaks.
- Put the fire extinguisher back in the car.


Pictures
Before:


After:

Cleaning the injectors
I wouldn’t recommend my injector cleaning process to anyone, since there are much more professional setups available. Still, I wanted to clean the injectors as best I could. The Delorean’s CIS injectors don’t have any plastic parts, and can be safely cleaned with solvents. I got a can of Berryman’s B12 Chemtool, and soaked the injectors in a jar for a few days, occasionally swishing them around, and trying to dump out any crud. I brought the pressure in my air compressor down to 80 psi, butted them up to a blow gun, and verified the injectors open and close with air pressure. In the future, I might build a hose attachment that’s screws into the injector and attaches to a compressor, so solvent can be blown through the injector for cleaning and testing. For this I might utilize some old, re-used copper washers.


I ripped apart an injector seal, and broke an injector clip when trying to bend it back into shape. I thought about trying to source them from a Volvo dealer, but ended getting them shipped from DMC Midwest.
I only dropped one copper washer… however it fell near some spent copper washers, and I couldn’t tell the new one from the old ones. I opted to just replace it with some spares I had.
Costs:
| Item | Vendor |
Quantity |
Unit Cost |
Cost |
Shipping |
Tax |
Total |
| Fuel Injection Lines Braided SS (9 pcs), Black | DMC Midwest |
1 |
$ 229.83 |
$ 229.83 |
$ – |
$ 17.81 |
$ 247.64 |
| Injector Clip | DMC Midwest |
1 |
$ 4.99 |
$ 4.99 |
$ – |
$ 0.39 |
$ 5.38 |
| Injector Seal | DMC Midwest |
1 |
$ 3.13 |
$ 3.13 |
$ – |
$ 0.24 |
$ 3.37 |
| Inch Pound Torque Wrench | Amazon.com |
1 |
$ 36.72 |
$ 36.72 |
$ – |
$ – |
$ 36.72 |
|
$ 293.11 |